You set up your email server, build your list, launch your first campaign, and within 48 hours your IP is on a blacklist. Your emails are bouncing, your inbox rate has crashed, and your sender reputation is damaged.
This is the reality for the majority of businesses attempting bulk email for the first time. 78% of email delivery failures are caused by IP or domain blacklisting. The problem is not that bulk email is inherently risky, it is that most senders skip the foundational steps that prevent blacklisting in the first place.
78%
of delivery failures from blacklisting
300+
active email blacklists worldwide
0.1%
max complaint rate before blocking
24-72h
typical delisting turnaround
This guide covers everything you need to know about sending unlimited emails without getting blacklisted, from understanding how blacklists work, to prevention strategies, to recovery when things go wrong. Whether you are sending 10,000 or 1 million emails per day, these principles will keep your IPs clean and your emails in the inbox.
At BulkEmailSetup, we have helped hundreds of businesses scale their email sending without blacklist issues. This guide is built on that real-world experience.
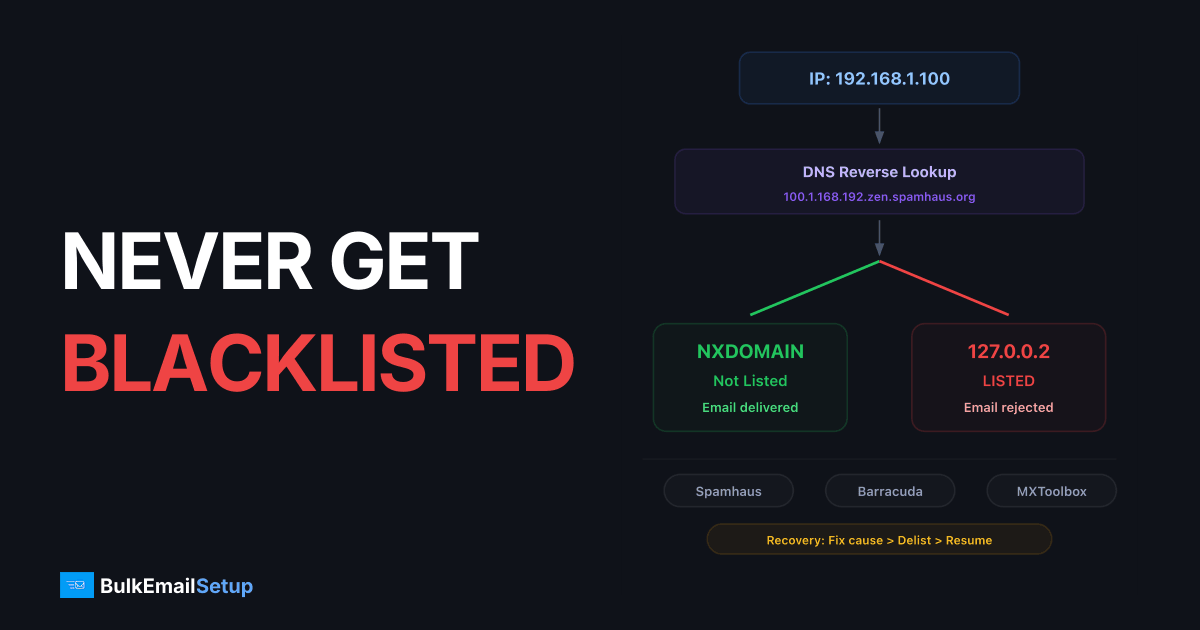
How Email Blacklists Actually Work
How blacklist DNS lookups work
Your Mail Server IP
192.168.1.100
DNS Query (IP reversed)
100.1.168.192.zen.spamhaus.org
NXDOMAIN
Record not found
NOT LISTED
Email Delivered
127.0.0.2
Record found
LISTED
Email Rejected
An email blacklist (also called a DNSBL or RBL) is a real-time database of IP addresses and domains identified as sources of spam. When a receiving mail server gets an incoming connection, it checks the sender's IP against one or more blacklists before accepting the message.
If your IP is listed, the receiving server will either reject the connection entirely (hard block) or accept the email but route it to spam (soft block). The result is the same: your emails do not reach the inbox.
Types of Blacklists
Not all blacklists are created equal. There are hundreds of them, but only a handful have significant impact on your delivery. Understanding the different types helps you prioritize what to monitor and fix.
| Type | How It Works | Impact Level | Examples |
|---|---|---|---|
| IP-based blacklists | List individual IP addresses that have sent spam | Critical, most ISPs check these | Spamhaus SBL, Barracuda, SpamCop |
| Domain-based blacklists | List domains found in spam email content or headers | High, increasingly important | Spamhaus DBL, SURBL, URIBL |
| Composite blacklists | Combine multiple data sources into a single lookup | High, broad coverage | Spamhaus ZEN, Invaluement |
| Internal ISP blacklists | Each ISP maintains its own private blacklist based on user complaints | Critical, not publicly visible | Gmail, Outlook, Yahoo internal lists |
| Open relay blacklists | List servers that allow unauthenticated relaying | Critical, immediate listing | Spamhaus XBL, CBL |
Internal ISP Blacklists Are Invisible
Gmail, Outlook, and Yahoo all maintain internal blacklists that you cannot see or check. These are based on user behavior, when recipients mark your emails as spam, the ISP records that. Enough complaints and your IP gets silently blocked. The only way to know is by monitoring your delivery rates and using tools like Google Postmaster Tools.
How You Get Blacklisted
Blacklisting is not random. It happens because of specific, detectable behaviors. Here are the seven most common triggers:
High Bounce Rate
Bounce rates above 2-5% signal to blacklist operators that you are sending to unverified addresses. This is the #1 trigger for new senders.
Spam Complaints
When recipients click 'Report Spam,' that data flows to blacklist operators. Even 0.1% complaint rate can trigger a listing.
Volume Spikes
Going from 0 to 100,000 emails overnight from a new IP is the behavior pattern of a compromised server or spammer. ISPs block first, ask questions later.
Spam Trap Hits
Sending to spam trap addresses, fake or recycled addresses that no real person uses, is definitive proof of bad list practices.
Missing Authentication
Sending email without SPF, DKIM, and DMARC makes your server indistinguishable from a spam source. Many blacklists automatically list unauthenticated senders.
Purchased Lists
Bought or scraped email lists are loaded with spam traps, invalid addresses, and people who never opted in. Using them guarantees blacklisting.
is how quickly a new IP can get blacklisted if you send bulk email without warming up first. Some blacklists like Spamhaus use automated systems that detect and list suspicious sending patterns within minutes.
Prevention Strategy 1: Proper IP Warm-Up
IP Warm-Up: Volume vs Reputation
Sending volume must rise gradually as reputation builds. Exceeding the safe zone triggers throttling and blocks.
The single most effective way to prevent blacklisting is proper IP warm-up. New IPs have no reputation, ISPs have never seen email from them before. If you immediately start sending high volume from a new IP, it looks exactly like a compromised server or a spam operation.
Warm-up means gradually increasing your sending volume over 4-8 weeks while sending to your most engaged subscribers first. This builds a positive reputation signal with ISPs before you scale to full volume.
Warm-Up Rules for Blacklist Prevention
IP Warm-Up Essentials
- ✓Start with 100-500 emails per day in week 1, no exceptions
- ✓Only send to subscribers who have opened an email in the last 30 days during weeks 1-2
- ✓Increase volume by no more than 2x per week
- ✓Monitor bounce rates after every send, if bounces exceed 2%, reduce volume immediately
- ✓If any IP gets blacklisted during warm-up, pause that IP and investigate before resuming
- ✓Never skip warm-up even if you are 'in a hurry', rushing guarantees blacklisting
- ✓Spread sending across the full day rather than blasting all at once
- ✓Use separate IPs for transactional and marketing email during warm-up
Pro Tip
The most common warm-up mistake is impatience. Businesses skip to week 4 volumes after just a few days because “everything looks fine.” The problem is that blacklist operators and ISPs accumulate data over time, you might not see the impact for 48-72 hours. By then, the damage is done.
For detailed warm-up schedules tailored to each server tier, see our guides: Basic Server Warm-Up, Advanced Server Warm-Up, and Custom Server Warm-Up.
Prevention Strategy 2: Aggressive List Hygiene
Your email list is the primary source of blacklist risk. Every bad address on your list, bounced addresses, spam traps, unengaged subscribers, role-based accounts, is a potential blacklist trigger. The cleaner your list, the lower your blacklist risk.
The List Quality Pyramid
Spam trap blast radius
Hitting a single spam trap does not just affect that one email, it poisons your sender reputation for every message on that IP.
1 trap hit → 100,000 emails affected
Every email from your IP is now under suspicion
Think of list quality as a pyramid. The best addresses are at the top, and every layer below introduces more risk:
Address Types and Their Blacklist Risk
| Address Type | Blacklist Risk | What To Do |
|---|---|---|
| Active, engaged subscribers | Minimal risk | Send freely, these are your safest addresses |
| Subscribers who opened in last 90 days | Low risk | Safe to include in regular campaigns |
| Inactive 6+ months, never opened | Medium risk, may have become spam traps | Run a re-engagement campaign. If no response after 2 attempts, remove |
| Soft bounces (repeated 3+ times) | High risk, likely abandoned accounts | Remove after 3 consecutive soft bounces |
| Hard bounces | Critical, immediate blacklist risk | Remove immediately after first hard bounce. Never re-send |
| Role-based (info@, sales@, support@) | High risk, monitored by anti-spam systems | Remove from marketing lists entirely |
| Purchased / scraped addresses | Critical, guaranteed spam traps in the list | Never use. Delete the entire list |
Email Verification Before Sending
Before loading any list into your email system, run it through an email verification service. These services check every address for:
- Syntax validation, Is the email format correct?
- Domain check, Does the domain exist and accept email?
- MX record lookup, Does the domain have mail servers configured?
- Disposable email detection, Is this a temporary address from a service like Guerrilla Mail?
- Spam trap detection, Is this a known spam trap address?
- Catch-all detection, Does the domain accept all addresses (making validation impossible)?
Verification ROI
Email verification typically costs $1-5 per 1,000 addresses. Compare that to the cost of blacklisting: lost revenue from undelivered campaigns, time spent on delisting requests, and weeks of reduced inbox rates while your reputation recovers. Verification is one of the highest-ROI investments in email.
Double Opt-In: Your Best Defense
Double opt-in (also called confirmed opt-in) requires new subscribers to click a confirmation link in a verification email before being added to your list. This single practice eliminates:
- Typo addresses (gmial.com, yaho.com)
- Fake signups and bot submissions
- Spam trap addresses entered maliciously
- Addresses entered without the owner's consent
Single Opt-In
- ✗Any address is added immediately
- ✗Typos and fake addresses slip through
- ✗Spam traps enter your list easily
- ✗Higher bounce rates from day one
- ✗No proof of consent for compliance
Double Opt-In
- ✓Only confirmed real addresses
- ✓Zero typos, address must work
- ✓Spam traps blocked automatically
- ✓Near-zero bounce rate for new signups
- ✓Documented proof of consent (GDPR, CAN-SPAM)
Prevention Strategy 3: Complete Email Authentication
Email authentication proves that your server is authorized to send email on behalf of your domain. Without it, your email is indistinguishable from spoofed or forged messages, and blacklist operators treat unauthenticated senders as spam by default.
SPF (Sender Policy Framework)
SPF tells receiving servers which IPs are authorized to send email for your domain. Without SPF, any server in the world can claim to be sending from your domain.
Blacklist impact: Many blacklists automatically list IPs that send email from domains without SPF records. This is treated as a fundamental hygiene failure. An SPF record takes 5 minutes to configure and immediately reduces your blacklist risk.
DKIM (DomainKeys Identified Mail)
DKIM adds a cryptographic signature to every outgoing email. The receiving server verifies this signature against a public key in your DNS, proving the email was genuinely sent by your domain and was not tampered with in transit.
Blacklist impact: DKIM provides domain-level authentication that persists even when your email is forwarded. ISPs and blacklist operators give significantly more trust to DKIM-signed email. Gmail in particular weights DKIM heavily in its filtering decisions.
DMARC (Domain-based Message Authentication, Reporting & Conformance)
DMARC ties SPF and DKIM together and tells ISPs what to do when authentication fails. It also provides reporting so you can see exactly who is sending email using your domain, including unauthorized senders.
Start with p=none for monitoring
Publish v=DMARC1; p=none; rua=mailto:[email protected]. This does not block anything but sends you reports about all email using your domain. Run this for 2-4 weeks.
Review reports and fix issues
Check that all your legitimate sending sources pass SPF or DKIM alignment. Fix any sources that fail. Common issues: third-party services not included in SPF, DKIM not configured for marketing platforms.
Escalate to p=quarantine
Once all legitimate sources pass, switch to p=quarantine; pct=25 to start quarantining 25% of failing messages. Gradually increase the percentage.
Full enforcement with p=reject
The final step: p=reject tells ISPs to reject all email that fails DMARC. This provides maximum protection against domain spoofing and gives ISPs the strongest trust signal.
Reverse DNS (PTR Records)
Reverse DNS maps your sending IP back to a hostname. When a receiving server sees a connection from your IP, it does a reverse lookup to verify that the IP legitimately belongs to a domain. If the PTR record is missing or points to a generic hostname (like192-168-1-1.host.com), many servers will reject the connection immediately.
Authentication With BulkEmailSetup
All four authentication protocols, SPF, DKIM, DMARC, and rDNS, are configured automatically during BulkEmailSetup installation. You do not need to set these up manually.
Prevention Strategy 4: IP Rotation and Distributed Sending
When you send all your email from a single IP address, that IP absorbs all the risk. If it gets blacklisted, 100% of your sending stops. IP rotation distributes your sending across multiple IPs, reducing the risk and impact of any single IP getting listed.
How IP Rotation Prevents Blacklisting
Major ISPs enforce per-IP sending limits. Gmail, for example, will throttle or temporarily block an IP that sends too many emails too quickly. These limits are not published, but practical experience shows that a single IP can reliably send 5,000-20,000 emails per day to mixed recipients without triggering rate limits.
| Volume Target | IPs Needed | Per-IP Daily Limit | Safety Margin |
|---|---|---|---|
| 10,000/day | 2-3 IPs | 3,300-5,000 | Low risk |
| 50,000/day | 5-10 IPs | 5,000-10,000 | Safe with warm-up |
| 100,000/day | 10-20 IPs | 5,000-10,000 | Requires managed rotation |
| 500,000/day | 30-50 IPs | 10,000-17,000 | Advanced setup needed |
| 1,000,000/day | 50-60 IPs | 17,000-20,000 | Custom infrastructure required |
IP Rotation Strategies
Round Robin
- ✓Distributes emails evenly across all IPs
- ✓Simple to implement and understand
- ✓Each IP handles equal load
- ✓Good for general bulk sending
- ✓No ISP-specific optimization
Weighted Rotation
- ✓Assigns more volume to higher-reputation IPs
- ✓New IPs get warm-up level traffic
- ✓Established IPs carry more load
- ✓Adapts to reputation changes
- ✓Best for mixed IP pools
ISP-Based Routing
- ✓Assigns specific IPs to specific ISPs
- ✓IPs 1-5 handle Gmail, IPs 6-10 handle Outlook
- ✓Optimizes for each ISP's unique limits
- ✓Isolates ISP-specific reputation issues
- ✓Most complex but highest deliverability
Learn more about IP rotation at scale in our guide on sending 1 million emails per day.
Prevention Strategy 5: Content That Avoids Spam Triggers
Even with perfect authentication and clean lists, your email content can trigger spam filters and contribute to blacklisting. Content-based blacklists like SURBL and URIBL specifically scan email content for patterns associated with spam.
Content Red Flags That Trigger Blacklists
Blacklist-Triggering Content
- ✗ALL CAPS SUBJECT LINES!!!
- ✗Image-only emails with no text
- ✗URL shorteners (bit.ly, tinyurl)
- ✗Excessive exclamation marks (!!!)
- ✗Hidden text or tiny white fonts
- ✗Links to blacklisted domains
- ✗Misleading subject lines
Safe, Professional Content
- ✓Clear, descriptive subject lines
- ✓60:40 text-to-image ratio minimum
- ✓Full branded URLs on your domain
- ✓Professional, measured tone
- ✓Visible, readable text only
- ✓Links to reputable, clean domains
- ✓Subject lines that match content
URL and Link Reputation
Domain-based blacklists (DBLs) track the reputation of URLs found in email content. If any link in your email points to a blacklisted domain, the entire email may be flagged, even if your sending IP is clean.
- Never use URL shorteners, Services like bit.ly are heavily abused by spammers to hide malicious URLs. Using them in bulk email is a direct spam signal.
- Use your own tracking domain, Instead of generic tracking domains provided by email services, configure a subdomain on your own domain for link tracking.
- Check link destinations, Before sending, verify that none of the URLs in your email point to blacklisted or compromised domains.
- Avoid linking to newly registered domains, Domains less than 30 days old are treated with suspicion by content filters.
HTML Structure Best Practices
Email Content Safety Checklist
- ✓Include both HTML and plain text versions of every email
- ✓Maintain at least a 60:40 text-to-image ratio
- ✓Use no more than 3-5 links per email for marketing messages
- ✓Include a visible, working unsubscribe link (required by CAN-SPAM)
- ✓Include your physical business address in the footer
- ✓Keep total email size under 100KB
- ✓Use standard HTML tables for layout, avoid complex CSS that breaks in email clients
- ✓Do not use JavaScript or form elements in emails (they get stripped or flagged)
- ✓Test rendering across major email clients before sending
Blacklist Monitoring: Catching Issues Early
You cannot prevent what you cannot see. Regular blacklist monitoring is essential because the sooner you catch a listing, the less damage it does to your overall reputation. Many senders do not discover they are blacklisted until they notice a dramatic drop in open rates, by which point, the damage has been accumulating for days or weeks.
Blacklists That Matter Most
While there are 300+ blacklists, only a small number significantly affect deliverability. Here are the ones you must monitor:
| Blacklist | Severity | Used By | Listing Duration |
|---|---|---|---|
| Spamhaus SBL | Critical | Most ISPs worldwide, corporate servers | Until manually resolved + reviewed |
| Spamhaus XBL | Critical | Same as SBL, focuses on exploited IPs | Automatic after bot/malware removed |
| Spamhaus DBL | Critical | Domain-level blocking across ISPs | Until manually resolved |
| Barracuda (BRBL) | High | Corporate mail servers, Barracuda appliances | Self-removal after behavior improves |
| SpamCop | Medium | Various ISPs, corporate servers | Auto-expires 24-48h after last complaint |
| Invaluement | Medium | Corporate servers, some ISPs | Manual review required |
| SORBS | Low-Medium | Some corporate and regional ISPs | Varies by zone, some auto-expire |
Setting Up Monitoring
Check all IPs weekly with MXToolbox
Run every sending IP through MXToolbox's blacklist check at least once per week. This checks against 100+ blacklists simultaneously. Bookmark the URL for each IP so you can run checks quickly.
Set up Google Postmaster Tools
Verify your domain in Google Postmaster Tools and monitor your domain reputation weekly. Gmail does not use external blacklists, it maintains its own internal reputation system. Postmaster Tools is the only way to see it.
Register for Microsoft SNDS
Microsoft Smart Network Data Services shows your IP reputation with Outlook/Hotmail, complaint rates, and trap hits. Essential for senders with significant Outlook audiences.
Register for ISP Feedback Loops
Most major ISPs offer feedback loops (FBLs) that notify you when a recipient marks your email as spam. Register for FBLs with Yahoo, Outlook, AOL, and others. Automatically remove complainers from your list.
Monitor delivery metrics per campaign
Track inbox rate, bounce rate, and spam complaint rate for every campaign. A sudden change in any of these metrics is often the first sign of a blacklist issue before external tools detect it.
Legal Compliance: CAN-SPAM, GDPR, and CASL
Legal compliance is not just about avoiding fines, it directly affects your blacklist risk. Violating email regulations increases spam complaints, which increases blacklisting. Every compliance requirement exists because non-compliance leads to spam-like behavior.
CAN-SPAM Requirements (United States)
CAN-SPAM Compliance
- ✓Include your valid physical postal address in every commercial email
- ✓Use accurate From name and email address, no deception
- ✓Write honest, non-misleading subject lines
- ✓Include a clear, conspicuous unsubscribe mechanism
- ✓Honor opt-out requests within 10 business days
- ✓Identify the message as an advertisement (if applicable)
- ✓Monitor what others are doing on your behalf, you are responsible for third-party senders
GDPR (European Union)
GDPR requires explicit, informed consent before sending marketing email to EU residents. Unlike CAN-SPAM's opt-out model, GDPR requires opt-in. Pre-checked boxes do not count. You must also provide easy unsubscribe, data access rights, and data deletion upon request.
CASL (Canada)
Canada's Anti-Spam Legislation is one of the strictest in the world. It requires express consent (not implied) for commercial emails, and penalties reach up to $10 million per violation. If you have Canadian recipients on your list, CASL compliance is not optional.
Compliance = Deliverability
Every compliance requirement, unsubscribe links, accurate sender identity, consent management, reduces the behaviors that cause blacklisting. Non-compliance is not just a legal risk; it is a direct path to blacklisted IPs.
Blacklist Recovery: What to Do When You Get Listed
Blacklist recovery timeline
Getting off a blacklist is not instant. Here is the realistic timeline from detection to full recovery, totaling 15 days.
Detection
Investigation
Root Cause Fix
Delisting Request
Waiting Period
Gradual Resume
2h
4h
20h
24h
120h
168h
338h
Total downtime
~15
Days to recover
$$$$
Revenue at risk
Getting blacklisted is not the end. It is a recoverable situation, if you handle it correctly. The biggest mistakes people make during blacklist recovery are panicking and either (a) ignoring the listing hoping it goes away, or (b) requesting removal without fixing the underlying cause.
Step-by-Step Blacklist Recovery
Identify which blacklists you are on
Use MXToolbox to check all your sending IPs and domains. Document every blacklist listing, including the date discovered and the reason given (if available). Most blacklists provide a reason or evidence URL when you look up a listed IP.
Pause sending from affected IPs
Stop sending from blacklisted IPs immediately. Continuing to send while listed worsens the listing, may trigger additional blacklistings, and extends the time needed for recovery. If you have other clean IPs, you can shift traffic to those temporarily.
Investigate and fix the root cause
Blacklistings have specific causes: a bounce spike from a bad list import, a complaint spike from an aggressive campaign, a spam trap hit from old addresses, or a compromised account being used to send spam. Identify the exact cause and fix it before proceeding.
Clean your list aggressively
Run your entire list through email verification. Remove all hard bounces, soft bounces with 3+ failures, addresses that have not engaged in 6+ months, and all role-based addresses. After recovery, you want only your cleanest addresses.
Submit delisting requests
Visit each blacklist's website and submit a removal request. Be honest about what happened and what you did to fix it. Blacklist operators deal with thousands of requests, being transparent and showing corrective action speeds up the process significantly.
Resume sending with a mini warm-up
After delisting, do not immediately return to full volume. Treat the delisted IP like a freshly assigned IP and do a shortened warm-up (1-2 weeks) sending only to your most engaged subscribers. Monitor every metric closely.
Delisting Timelines by Blacklist
| Blacklist | Delisting Process | Typical Timeline |
|---|---|---|
| Spamhaus SBL | Submit removal at spamhaus.org with explanation of corrective action | 24-48 hours after review |
| Spamhaus XBL/CBL | Automatic removal after bot/malware is cleaned | Automatic after IP stops malicious activity |
| Barracuda BRBL | Self-service removal at barracudacentral.org | 12-24 hours |
| SpamCop | No manual removal, auto-expires after last complaint | 24-48 hours after last complaint stops |
| SORBS | Submit removal request, some require payment for expedited processing | 24-72 hours |
| Invaluement | Submit detailed removal request with sending practice changes | 48-72 hours after review |
| Microsoft/Outlook internal | Submit mitigation request through Microsoft SNDS | 24-48 hours, may require ongoing monitoring |
Pro Tip
If the same IP gets blacklisted twice for the same reason, recovery becomes much harder. Most blacklists escalate repeat offenders to longer listing durations or manual review. Fix the root cause the first time, there may not be an easy second chance.
Infrastructure Best Practices for Blacklist-Free Sending
Your sending infrastructure, the servers, IPs, and configuration behind your email, is either working for you or against you. Here are the infrastructure decisions that minimize blacklist risk.
Dedicated vs. Shared IPs
Shared IPs (SaaS Platforms)
- ✗Other senders' behavior affects your reputation
- ✗No control over IP reputation
- ✗One bad sender blacklists everyone on the IP
- ✗Cannot warm up or manage the IP yourself
- ✗Limited recourse when blacklisted
Dedicated IPs (Own Infrastructure)
- ✓Your reputation is yours alone
- ✓Full control over sending behavior
- ✓Bad behavior only affects your own IPs
- ✓Complete warm-up and management control
- ✓Can replace individual IPs if needed
Server Security and Open Relay Prevention
An open relay is a mail server that allows anyone to send email through it without authentication. If your server is configured as an open relay, spammers will find it and use it within hours, and your IPs will be blacklisted within minutes.
Server Security Checklist
- ✓SMTP authentication required for all outgoing email, no open relay
- ✓TLS encryption enabled for all connections
- ✓Strong passwords on all email accounts
- ✓Firewall restricting SMTP port access to authorized IPs only
- ✓Rate limiting configured to prevent abuse from compromised accounts
- ✓Automated alerts for unusual sending volume spikes
- ✓Regular security updates and patches applied to mail server software
- ✓SSH access restricted and secured with key-based authentication
Bounce Processing and Feedback Loops
Your server must automatically process bounces and feedback loop reports. Every hard bounce should immediately remove the address from your list. Every FBL complaint should suppress the complainer from future sends. If you are not processing these signals, you are accumulating blacklist risk with every campaign.
With BulkEmailSetup, bounce processing and complaint handling are configured automatically. Hard bounces are removed from your lists, and feedback loop complaints are automatically suppressed.
The 10 Most Common Blacklisting Mistakes
After helping hundreds of businesses recover from blacklisting, we see the same patterns repeatedly. Here are the top mistakes, ranked by frequency:
- Skipping IP warm-up, The number one cause of blacklisting for new senders. There is no shortcut. Warm up every new IP gradually over 4-8 weeks.
- Using purchased email lists, Guaranteed spam traps, guaranteed blacklisting. Every purchased list we have ever seen contained spam trap addresses.
- Not removing hard bounces, Continuing to send to addresses that have already bounced tells blacklist operators you are not maintaining your list.
- Sending to old, unverified lists, If your list has not been cleaned in over a year, 30%+ of addresses may be invalid or converted to spam traps.
- No email authentication, Sending without SPF, DKIM, and DMARC makes you look like a spammer to every ISP and blacklist.
- Volume spikes, Going from 1,000 to 100,000 emails overnight is the behavior pattern of a compromised server. ISPs react accordingly.
- Ignoring complaints, Not processing spam complaints or making it hard to unsubscribe forces recipients to use the spam button, which directly feeds blacklists.
- No monitoring, Senders who do not check blacklists regularly discover they are listed weeks later, after significant reputation damage.
- Open relay configuration, Leaving your server open for unauthenticated relaying is an invitation for abuse and instant blacklisting.
- Requesting removal without fixing the cause, Getting delisted only to get re-listed for the same reason makes future removals much harder.
The Golden Rule
Every blacklist listing is caused by a specific, identifiable behavior. Fix the behavior, and blacklisting stops. There is no magical “anti-blacklist” tool, only good practices consistently followed.
Frequently Asked Questions
How do I check if my IP is blacklisted?
Use MXToolbox (mxtoolbox.com) to check your IP against 100+ blacklists simultaneously. You can also check individual blacklists directly, Spamhaus at spamhaus.org, Barracuda at barracudacentral.org, etc. Run these checks weekly for all your sending IPs.
Can I prevent blacklisting entirely?
You can reduce the risk to near zero by following best practices consistently: proper warm-up, clean lists, complete authentication, good content, and regular monitoring. However, no sender is 100% immune, even legitimate senders occasionally end up on minor blacklists due to overly aggressive filters. The key is early detection and quick response.
How long does it take to recover from blacklisting?
Delisting typically takes 24-72 hours once you submit a removal request. However, recovering your full sending reputation takes 2-4 weeks of clean sending. If your domain reputation was damaged, recovery can take 4-12 weeks. The faster you catch and address the issue, the shorter the recovery.
Should I just get new IPs if mine are blacklisted?
Sometimes, but it depends on the situation. If the blacklisting was caused by a one-time incident (like a bad list import), delisting and recovery is usually faster than warming up new IPs. If the IPs have extensive blacklist history across multiple lists, new IPs may be the better option. Remember that domain reputation follows you regardless of IP changes.
Does blacklisting affect all my email or just marketing?
If you send transactional and marketing email from the same IPs, a blacklisting affects both. This is why we strongly recommend using separate IP pools for transactional email (receipts, password resets) and marketing email. If your marketing IPs get blacklisted, your transactional delivery continues unaffected.
How many emails can I send per day without getting blacklisted?
There is no universal limit, it depends on your IP reputation, warm-up status, and list quality. A fully warmed, established IP with good reputation can send 20,000+ emails per day reliably. With proper IP rotation across multiple IPs, you can scale to 1 million emails per day without blacklisting.
Is it better to send all emails at once or spread them throughout the day?
Spread them out. Sending 50,000 emails in 5 minutes looks very different to ISPs than sending 50,000 emails over 8 hours. Gradual, consistent sending throughout the day is less likely to trigger rate limiting or blacklist attention.
Do I need to worry about blacklists if I use a SaaS email platform?
Yes, but differently. On shared IPs (most SaaS platforms), other senders' behavior can get the shared IP blacklisted, affecting your deliverability even if your practices are perfect. This is one of the key reasons high-volume senders move to dedicated infrastructure where they control their own reputation.
Conclusion: Blacklist-Free Sending Is a Discipline
Sending unlimited emails without getting blacklisted comes down to discipline, doing the right things consistently, every time you send. There is no secret trick or tool that makes you immune to blacklisting. It is the result of proper warm-up, clean lists, complete authentication, thoughtful content, and constant monitoring.
The businesses that send millions of emails per day without blacklist issues are not doing anything magical. They are simply following the fundamentals outlined in this guide with unwavering consistency.
Summary
- Warm up every new IP gradually over 4-8 weeks, no exceptions
- Clean your list aggressively, remove bounces immediately, verify before importing, re-engage or remove inactive subscribers
- Configure SPF, DKIM, DMARC, and rDNS before sending a single email
- Use IP rotation to distribute volume and reduce single-IP risk
- Write professional content, avoid spam triggers, URL shorteners, and misleading subject lines
- Monitor blacklists weekly and catch issues before they escalate
- When blacklisted, fix the root cause first, then request removal, then resume with a mini warm-up
If you want email infrastructure with dedicated IPs, automatic authentication, bounce processing, and IP rotation built in, check out our setup plans. We handle the infrastructure so you can focus on sending, without worrying about blacklists.


